A Simple Step-by-Step Guide By a Qualified Alarm Technician
As an experienced alarm technician, I get lots of calls and emails each week asking how to reset the master code in a Bosch alarm system.
I decided to write this quick and helpful guide that I can just send to anyone that has the same problem. It’s easy to do and will only take a few minutes.
How To Reset The Master Code On A Bosch Alarm System
- Open the lid of the alarm panel
- Disconnect power to the alarm panel – both mains and battery power
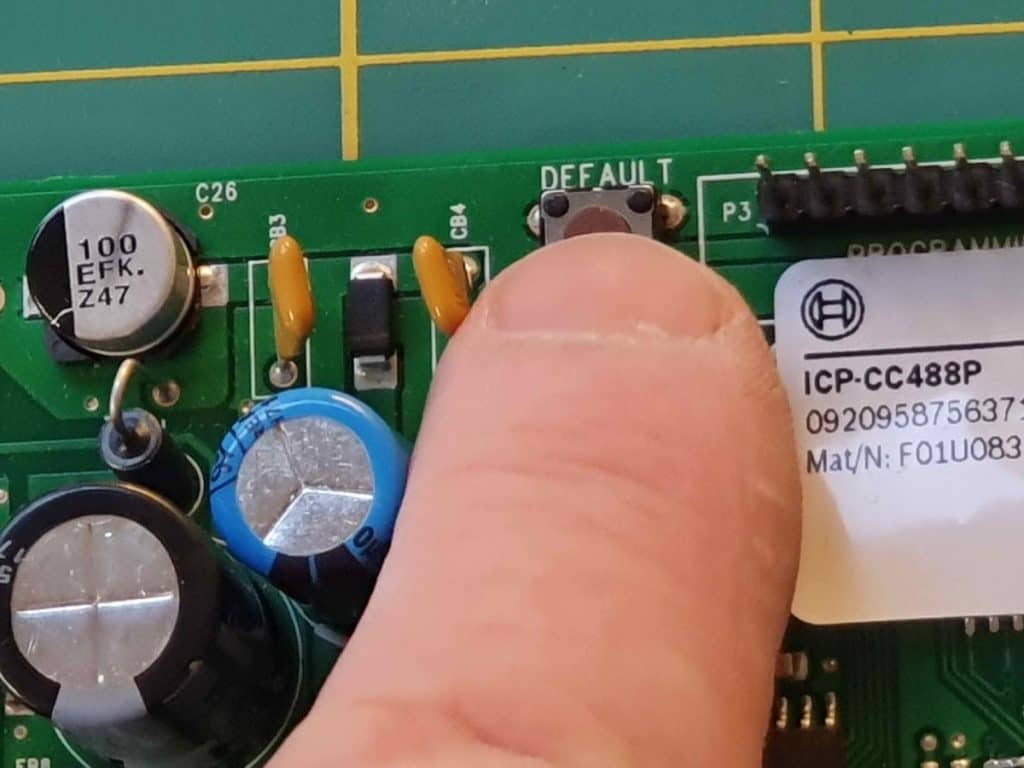
- Press and hold the ‘Default’ button while reconnecting the battery (see photo for location of ‘Default’ button
- Continue to hold the ‘Default’ button for 10 second
- Release the reset button
- Turn the mains power back on
OK, now go to the codepad and make sure the system has defaulted.
This method works on these Bosch alarm systems:
Bosch Solution 862 |Bosch Solution 844 | Bosch Solution 880 | Bosch Solution 2000 | Bosch Solution 3000
Watch the Step-by-Step Video Below or Read On…
Reprogramming Your System
First you’ll need to check that the procedure worked by testing the Master User Code.
Go to the codepad and enter the following:
2580, AWAY (or #) – the system should arm (2580 is the default Master Code. I’ll show you how to change it next)
2580, OFF – the system should disarmed
If that worked, we’re in good shape.
Next try to enter Installer Program Mode:
Press [ 1 ] [ 2 ] [ 3 ] [ 4 ] [ AWAY] (1234 is the default Installer Code)
The two STAY and AWAY icons should be flashing. If they are, you have successfully entered Installer Programming Mode. We don’t need to do anything here yet, so we’ll exit programming mode:
Press [ 9 ] [ 6 ] [ 0 ], [ AWAY ] to exit programming mode.
The system should go back to it’s normal screen.
The next step is to stop the codepad from beeping and reset the time and date.
VIDEO Demo Of Above
It Didn’t Work!
That’s OK, re-read the procedure above and try again.
If you follow the procedure exactly it works every time!
Codepad Beeping and Shows Triangle With Exclamation Mark
This is normal after reconnecting power to the alarm. The system needs the time and date to be set after a panel re-boot.
Follow this simple procedure to Acknowledge and clear the fault.
1 – Press the AWAY or # button. That will immediately stop the beeping
2 – Press and hold the 5 key til you hear 2 beeps.
The codepad will enter ‘Fault Diagnosis’ mode and display one or more numbers.
Use this table to see what the numbers mean. (add table in WP)
The only fault you should have is Date/Time not Set.
(If you have other faults, no problem. I’ve written a quick guide to resetting faults in Bosch panels HERE.)
Here’s how to set the time and date:
Enter: 2580, 6, AWAY. That tells the system you’re changing the date and time.
Enter 2 digits for the day (01-31), then 2 digits for the Month (01-12), then 2 digits for the Year (00-99), then 2 digits for the hour (00-23), then 2 digits for the minute (00-59), then press AWAY to store the setting and exit programming mode.
As an example, if today is 25 December 1955 at 2:15 in the afternoon, here’s what you’d press:
1 – Go into Date and Time programming:
Press 2580, 6. Away. The two ‘Person’ icons should be flashing.
Press 2,5,1,2,5,5,1,4,1,5,AWAY.
At this point you might wonder why the system needs the time and date set. After all, it’s not even displayed on the codepad!
There’s a little-known feature of the Bosch Solution panels that allow it to automatically arm and disarm at a pre-set time. The auto arming feature uses the time and date setting to do this.
If you need help with any other fault condition, read the full Simple Bosch Alarm Trouble-shooting Guide HERE
Next I’ll show you how to change the master code and add more user codes.
To change the master code:
Press 2580 then 1, then AWAY (or #). The two ‘people’ icons will flash
2 – Press 1, then press AWAY
3 – Enter the new code you’d like to use to arm and disarm your system.
4 – Press AWAY
Test the code:
Enter your new 4 digit code and press AWAY. The system should arm
Press your new 4 digit code and press STAY (or*). The system should disarmed
Ok, so now the old master code (2580) has been replaced with your own code.
The master code can be used to add and delete other codes. The Master Code is User 1 in the system.
To add a second code:
Enter your Master Code, press 1, then press AWAY
2 – Press 2, then press AWAY
3 – Enter a new 4 digit code. (This will be User 2 in the system)
4 – Press AWAY
5- Test the code by arming, then disarming the system.
To add a third code, repeat the procedure for adding a second code BUT
at step 2, enter 3 (for user 3)
To add a forth code repeat the procedure above but at step 2, enter a 4.
Easy!
You can add up to 8 user codes.
User codes can be 1,2,3 or 4 digits in length.
New System Settings
Listed below are the default settings for your Bosch alarm after you’ve reset it to the factory settings.
At this point you could start using the system using the new codes you’ve just programmed.
The default settings should be OK for most home and office installations .
But to customise the system and to enhance your security you’ll probably want to make some changes.
Go on, have a go – It’s easy!
If you get stuck or really mess things up, you can always default the system and start again!
________________________________________________________________________________
The Default Settings After Defaulting the Bosch Solution Panel Are…
- Installer Code 1234.
- Master User Code: 2580
- Dialler is enabled.
- Dialler communication format is set to Contact ID (for professional back to base monitoring)
- Zone 1 – entry delay zone using Entry Delay Timer 1 (20 seconds)
- Zone 2 – Handover zone. (see definitions section below to understand what this means)
- Zone 3 – Handover zone
- Zone 4 – Handover zone
- Zone 5 – Instant zone
- Zone 6 – Instant zone
- Zone 7 – Instant zone
- Zone 8 – Instant zone
- None of the zones are active in Stay mode. If you need to have some areas off when you sleep you can set some zones to be active in Stay Mode
- All zones will trigger the sirens in AWAY mode
- STAY Mode zones trigger the siren and strobe light
- Sensor Watch is disabled for all zones
- Supervision of wireless sensors is disabled
- Auto arming and disarming is not set
- Stay button on the remote control is not enabled
- Chime option is set to off for all zones. see definitions
- Exit delay: 60 seconds
- Entry Time 1: 20 seconds
- Entry Time 2: 40 seconds
- Entry Guard Time: 0
Go here for the step-by-step installer programming guide.
I’ll show you:
- how to change the zone types
- how to switch off the dialler (also see how to set up self monitoring HERE)
- set up Stay mode for night time protection
- how to set entry and exit delays
- How to set the siren run time
Plus some other handy settings I think you’ll find useful
(MOST alarm technicians don’t even know some of this stuff!)
Important Note on Bosch Wireless Sensors and Remote Controls
Please Read Before You Default Your Alarm Panel
Be very careful about defaulting your Bosch alarm if you have wireless sensors and/or remote controls.
When you default your alarm panel, all the wireless devices will be removed from the system and need to be programmed back in.
This means you’ll need the 9 digit RFID for each wireless device.
Important: make sure you have the RFID for all remote controls and intruder sensors before starting.
There’s no way to program the wireless devices back in to the alarm panel without them.
Where To Find The RFID number
Bosch Wireless Motion Sensors: The RFID is on a sticker on the back of the sensor. You’ll need to unscrew the sensor from the wall and turn it over to find it. The sticker will look like this
RFID: XXXXXXXXX
Bosch Remote Controls: The RFID is printed on the back of the remote control. The older type of Bosch remotes tended to fade or disappear over time.
On The newer remotes (2015 onwards) the number is etched into the plastic case.
WARNING!!!
If you don’t have the RFID for the remote controls or motion sensors you will not be able to program them back into the system.
HINT: Thoughtful installers will record the RFID of each wireless sensor and remote to make reprogramming simple.
The most common place is on the inside of the alarm panel lid.
If they’re not recorded there, check the back pages of your Bosch User Manual.
If you have any doubts about reprogramming the wireless devices into your system,
Do not default your alarm panel
Call a licensed alarm technician.
He or she will get the job done for you in around an hour.
Definitions
Installer Code:
Use this code to customise the settings in your system. There are over 100 settings in the panel. You can change any of these with the Installer code. As a minimum, you’ll probably want to change these settings:
Set which zones will be Instant zones and Delayed zones
Program the entry and exit delay times
Set how long you want the sirens to run for
Set which sensors are active in Stay mode 1
Garage door control from Bosch remote (if applicable)
Telephone numbers to dial for either back to base or mobile phone alerting
Master User Code:
The master user code is used to add and delete other user codes and remote controls from the system. It’s also used to program the zones you want to be active in Stay Mode 2.
It can also be used to arm and disarm the system
User code capacity
Bosch Solution 2000
| Panel | Number of User Codes (PINs) | Number of Remote Controls (Optional Radio Receiver Req’d |
| Bosch Solution 844 | 8 | 21 |
| Bosch Solution 880 | 8 | 8 |
| Bosch Solution 862 | 8 | 8 |
| Bosch Solution 2000 | 32 | 21 |
| Bosch Solution 3000 | 32 | 32 |
The master user code can also perform some other handy functions you might not know about.
Click HERE for More or
Download the User Manual HERE
Handover Zones
This zone triggers instantly UNLESS an entry delay zone has been triggered first.
Chime Zones
That way the codepad will beep if that zone is triggered – even if the alarm system is off.
The best example of this is the door switch on a shop. When a customer walks in, the codepad will beep, alerting the shopkeeper that someone’s in the store. An extension beeper can also be set up if the codepad is not loud enough.
I hava an application note here that shows you how $4.99 each or all for $17.00
Theres applications for homes as well. I’ve set it up on:
- gun safes
- medicine cabinets
- garages.
Other Zone Types
You’re not just restricted to the 3 zone types used in the default settings. The Bosch alarm has other zone types including
Medical
24 hour Panic
Fire or Smoke
Keyswitch
Tamper
If you have remote controls, you can arm and disarm your alarm from outside the house. This way you can make all zones instant. Why give an intruder any delay at all?
Stay Mode 1
A way of turning the system on so that some sensors are active and others are disabled. It’s typically uesd to protect the living areas while you sleep while leaving the bedrooms disarmed.
Stay Mode 2
A second ‘area’ that can be used to arm a garage, studio or granny flat while leaving the sensors in the main house off.
Exit Delay
The amount of time until the system is Armed after you turn it on. It’s there so you don’t trip the system as you leave your premises. Keep this as short as possible.
Entry Delay 1
Assign this to the FIRST zone you will trip as you enter the premises. Make the timer longer enough so you can comfortably enter the home, get to the codepad and disarm the system. Also keep this as short as possible. Any subsequent zones that you’ll trip on the way to the codepad will be assigned as Handover zones.
Entry Timer 2
A second timer that can be assigned to a zone on a second entry to the building that needs longer to get to the codepad. A good example is a second entry door. If you occasionally come in through the back door you can assign a longer delay to the first zone you’ll trigger.
Entry Guard Timer
This timer is used when you arm the system in Stay Mode. All sensors that are active in Stay Mode will use this timer.
Sensor Watch
If a motion sensor of door/window switch is not triggered regularly, the system will send an alert.
A useful example is to check that elderly folks are getting up each day and moving around the house. Normally the motion sensor in the living room would be triggered at least once per day. If the occupent of the home didn’t trigger the sensor for some reason, (illness, had a fall etc) the Bosch panel would fire off a warning message. Works for both self monitored and professional back to base monitoring.
Wireless Sensor Supervision
The system can be set to alert you if a wireless sensor has not communicated with the alarm panel. There could be a couple of reasons for this. The most common reason is the battery in the sensor has gone flat. This setting should always be set to ‘on’.
Conclusion
The Bosch Solution alarm systems are a reliable and popular system that have stood the test of time.
They also have far more features and capabilities than are used by most installers.
If you take the time to read the Installer manual, you might be surprised by what you can get the system to do.
You now have all the information you need to default and reprogram your alarm system.
Who knows…. You might even turn this into a new career!
Need More Help?
For a short time I’m trialling a one-on-one 15 minute phone consultation service to talk you through any programming settings you’re having trouble with or if you feel more comfortable having a experienced and licensed technician talking you through the programming process.
A call costs $30.00 (FAR less than a service call by an alarm company.)
You’ll get to ask any questions you like and I’ll guide you through the steps to get the result you want.
Lodge a ticket here .
In any case, I hope you learned something!